


airsuperiority:B-52 and Avro Vulcan.Two big birds
This does a great job showing the size of the Vulcan.
Formation flight reblog.
Nothing to see here.
airsuperiority:B-52 and Avro Vulcan.Two big birds
This does a great job showing the size of the Vulcan.
Formation flight reblog.
Original source

Formation flight Sunday. Beechcraft generations.
I’ve been hanging onto these photos for over 15 years, I didn’t work directly on the reline project, but set up a database which held documents and photos for them.
Now that the database and the blast furnace are gone, hopefully there should be no issue with me sharing them.
Hope it brings back memories of happier times in the steel industry and would love to hear from anyone pictured.
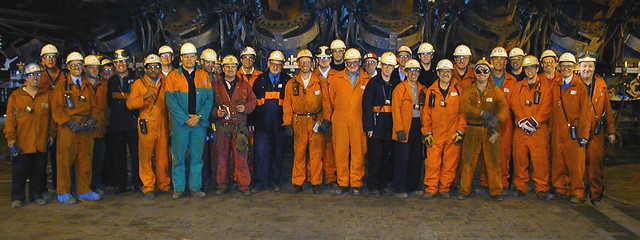


Full album of 49 photos below :-

I’ve always wondered why the guy at the end appears to be photoshopped in.

Well, this wasn’t planned for today but I had bought a replacement indicator because I knew it was coming.
What I had planned for today was taking a look at why the clicker and the dash indicator light weren’t working when signalling to turn right. After much digging around with a multimeter I worked through a couple of connectors that needed improving and ended up with the offside indicator in the wing.
It soon became apparent that the problems in this area would take longer to fix than replacing the unit. It looks like there was a creative repair in the past but the root of the problem stems from the design of the unit as a whole, it’s very exposed to corrosion and the wiring might be easy to fit when assembling the car at the factory but less so when coming to doing a repair.
The replacement is now fitted but I think I need to take a look at replacing the wiring for both wings at some point.
I’ve known there was a band of rust on the front cross box since I first looked at her but there was no evidence of a leak. However, the other day when I started her up cold I happened to notice that a small amount of condensation was bubbling out of a pinhole leak.
Whilst I will get round to replacing the cross box at some point it’s not a job I want to do at the moment – so time for a temporary fix.
With the front end up on axle stands I got out the wire brush to clean up the rust. Whilst it’s mostly surface rust, once it was cleaned up the source of the leak was apparent.

The exhaust bandage was fitted according to the instructions on the packaging, the most difficult part being feeding it round the top of the cross box.

Quick trip out to heat it up and cure the adhesive and job done (shortly before it started raining).

Clément-Bayard factory, Levalois-Perret, late 80s:
Ah, Pierre, shall we use ‘ose clips on any of zee many joints of zis deux-cheveaux fuel line? Bah non, John-Paul, zey cost two centimes each – do you zink, Monsieur Citroën, ‘e is made of money? Bof, ah theenk it is time for luunch anyway. Where is zee vin rouge? It occur to me – whilst ah eat mah baguette and drink mah vin rouge – zat maybe one of zeese unclipped joints may be zee weakest link in zis system as it can flex more zan zee rubber pipe we put in to abszob zee flex. Bof, we shall let some crazy Eeenglish fool deal wizz zat in 30 years.
30 years later:
After checking the visible fuel line for potential leaks the only place left to check was on top of the fuel tank and the only way to check that is to unbolt and lower the fuel tank. As fully lowering the fuel tank is realistically a two person job I had to make do with lowering it about 10cm using a trolley jack. This didn’t give me much access but I could see what was going on and get in with one hand.

There is a metal pipe that comes up from the fuel tank onto which a short length of rubber hose is attached. The other end of the hose is attached to a PVC fuel line which then runs down to the front of the chassis. This is a pretty good system for joining the metal pipe to the main PVC fuel line as the rubber hose can absorb any flex in the system between the fuel tank (which is mounted on rubber bushes) and the chassis. However, without a clip on the joint it means that the joint becomes the weakest point.

Examining this I could see that the hose at this joint in the fuel line had indeed developed a small split right at the end, weakening the joint, so was a potential source of a leak. Being at a high point of the system it wasn’t going to be letting fuel out but would have been allowing some air in.
Ideally I would have liked to replace the length of rubber hose but, with limited access, the best I was able to do was put a hose clip on the joint to hold the split closed and reinforce the joint.

This isn’t a long term fix but does buy me some time until I can fully replace the fuel line. With hose clips at every joint this time…
Update: With the able assistance and extra resources of TomB engineering we fully dropped the tank and that short length of split hose was replaced as part of a larger piece of work.
Original source


Dresden
Original source

Formation flight Sunday. Ka-52s

